


Photo by Marjan Blan on Unsplash
Integrating OpenLayers and ol-ext with Next.js: A Step-by-Step Guide to Create a Dual Map Layout


As seasoned developers, we've all felt the rush and hurdles that come with crafting GIS web apps. Geospatial data can be a wild beast to tame, and creating interactive maps adds a layer of complexity.
In this blog, we'll explore a basic use case of a dual map layout to demonstrate how OpenLayers and ol-ext can be your trusty allies in conquering the GIS web app domain within the confines of Next.js. But hey, let's keep it real – integrating these tools isn't a walk in the park. So, buckle up as we embark on a rollercoaster ride through the exhilarating realm of geospatial web development! 🚀
Step 1: Create a Next.js Project
Start by creating a new Next.js project using the following commands:
npx create-next-app dualmaps
cd dualmaps
For this project we will use JavaScript, Tailwind and App Router of Next.js.
Step 2: Install Dependencies
Install the required packages of OpenLayers and ol-ext:
npm install ol ol-ext
Step 3: Create Map Components
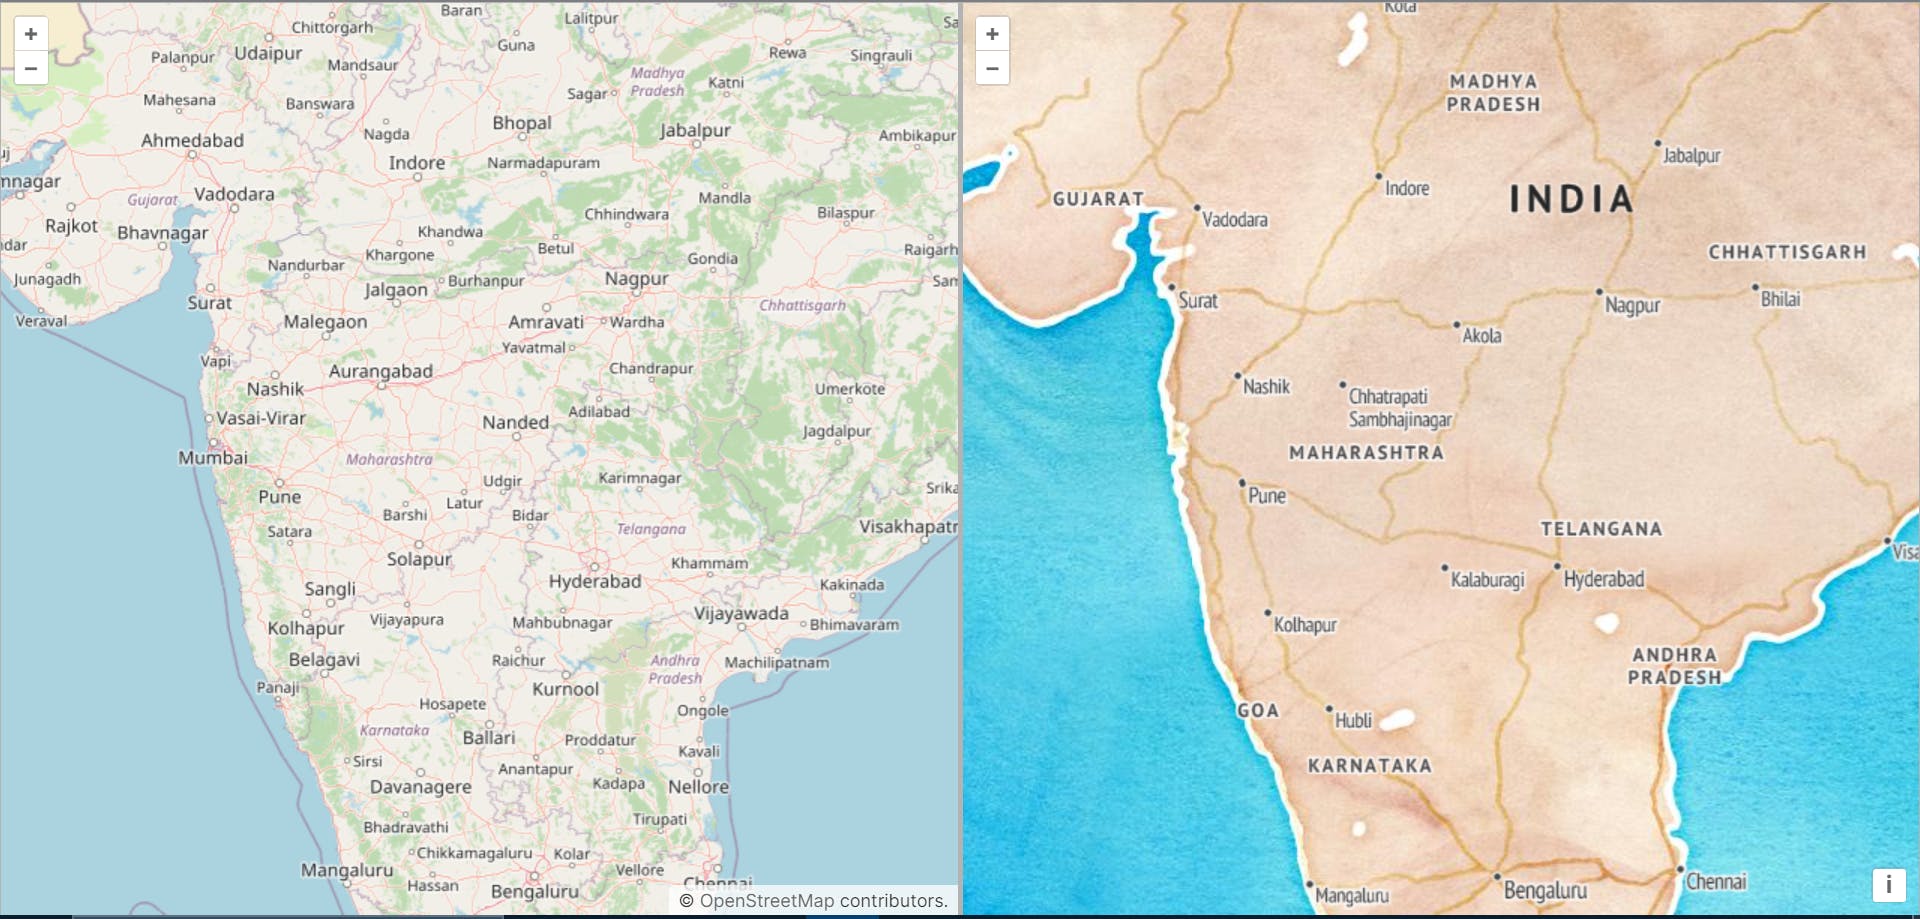
First, create a components folder inside the src folder. Inside that folder, create two components, Map1.js with an OpenStreetMap (OSM) layer and Map2.js with a Stamen watercolor layer with terrain labels, to represent the individual maps. Also apply styles to them using ol.css file:
// components/Map1.js
'use client'
import { useEffect, useRef } from 'react';
import 'ol/ol.css';
import Map from 'ol/Map';
import View from 'ol/View';
import TileLayer from 'ol/layer/Tile';
import OSM from 'ol/source/OSM';

const Map1 = ({setMap1Object}) => {

  const map1Container = useRef();

  // on component mount create the map and set the map refrences to the state
  useEffect(() => {
    const map1 = new Map({
      layers: [
        new TileLayer({
          source: new OSM(),
        }),
      ],
      view: new View({
        //Coordinate System: WGS 84 / Pseudo-Mercator-EPSG:3857
        center: [8546575.886939, 2137169.681579], // Longitude, Latitude
        zoom: 6
      }),
    });

    map1.setTarget(map1Container.current);
    setMap1Object(map1);

    // on component unmount remove the map refrences to avoid unexpected behaviour
    return () => {
      map1.setTarget(undefined);
      setMap1Object(null);
    };
  }, []);

  return (<><div ref={map1Container} className="absolute inset-0"></div></>);
};

export default Map1;
// components/Map2.js
'use client'
import { useEffect, useRef } from 'react';
import 'ol/ol.css';
import Map from 'ol/Map';
import View from 'ol/View';
import TileLayer from 'ol/layer/Tile';
import StadiaMaps from 'ol/source/StadiaMaps';

const Map2 = ({setMap2Object}) => {

  const map2Container = useRef();

  // on component mount create the map and set the map refrences to the state
  useEffect(() => {
    const map2 = new Map({
      layers: [
        new TileLayer({
          source: new StadiaMaps({
            layer: 'stamen_watercolor',
          }),
        }),
        new TileLayer({
          source: new StadiaMaps({
            layer: 'stamen_terrain_labels',
          }),
        }),
      ],
      view: new View({
        //Coordinate System: WGS 84 / Pseudo-Mercator-EPSG:3857
        center: [8546575.886939, 2137169.681579], // Longitude, Latitude
        zoom: 6
      }),
    });

    map2.setTarget(map2Container.current);
    setMap2Object(map2);

    // on component unmount remove the map refrences to avoid unexpected behaviour
    return () => {
      map2.setTarget(undefined);
      setMap2Object(null);
    };
  }, []);

  return (<><div ref={map2Container} className="absolute inset-0"></div></>);
};

export default Map2;
Step 4: Create DualMap Page
Inside the app folder, edit the page.js file to combine both maps on a single page and add the synchronize from ol-ext to sync both the maps. Also add ol-ext.css to properly visualise the sync effect:
// Main Landing Page "/" with dual maps
'use client'
import { useEffect, useState } from "react";
import Synchronize from "ol-ext/interaction/Synchronize";
import Map1 from "@/components/Map1";
import Map2 from "@/components/Map2";
import 'ol-ext/dist/ol-ext.css';

function DualMap() {

  const [map1Object, setMap1Object] = useState(null);
  const [map2Object, setMap2Object] = useState(null);

  // use synchronize from 0l-ext to sync both the maps
  useEffect(() => {
    if(!map1Object && !map2Object) return;
    var synchronize_12 = new Synchronize({ maps: [map2Object] });
    var synchronize_21 = new Synchronize({ maps: [map1Object] });

    map1Object.addInteraction( synchronize_12 );
    map2Object.addInteraction( synchronize_21 );

    return () => {
      if(map1Object) map1Object.removeInteraction(synchronize_12);
      if(map2Object) map2Object.removeInteraction(synchronize_21);
    }
  }, [map1Object, map2Object])

  return (
    <div className="flex h-[100vh] gap-[2px] bg-white/70" >
      <div className='relative w-1/2   border border-transparent'>
        <Map1 setMap1Object={setMap1Object}/>
      </div>
      <div className='relative w-1/2 border border-transparent'>
        <Map2 setMap2Object={setMap2Object}/>
      </div>
    </div>
  );
}

export default DualMap;
Step 5: Run the Application
Start your Next.js application:
npm run dev
Visit http://localhost:3000/ in your browser to see the dual map layout.
Step 6: Additional Configuration
Depending on your use case, you may need additional configuration. If more OpenLayers or ol-ext features are required, import the necessary modules and configure them within your map components. Explore the official documentation of OpenLayers and ol-ext for advanced features and customization options tailored to your specific requirements.
Reference:
ol-ext Synchronize interaction: https://viglino.github.io/ol-ext/examples/misc/map.interaction.synchronize.html
For the whole code, visit this GitHub Repository.
With this we have built a fully functional Dual Map Layout using Next.js, OpenLayers and ol-ext. I hope this helps you in some way in your development journey.